Thursday, October 27, 2011

The Basic Elements: Electronics Design

The Basic Elements: Electronics Design

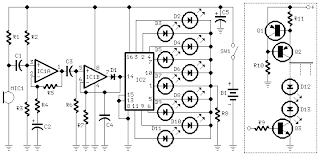
Both in diagram and products, electronics design primarily incorporates lines, shapes, and direction. These forms are best suited to describing electronics, as they are concerned with current and the different functions which control it. It is just as important which parts are involved in a circuit as about how they are connected.

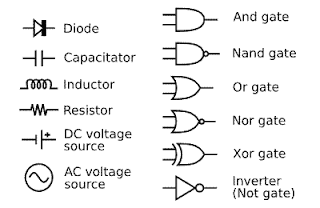
The line, for example, is key in showing connectivity. Showing what is connected is similarly as important as how they are connected. These connections are best illustrated through the use of lines and shapes to connect the various pieces together. In this way, complicated electrical circuits can be rendered (relatively) simply. A resistor, for example, is represented by a zig-zaged line, which also represents its function as compressed resistance. Capacitors are represented similar to their construction, with two parallel lines that do not touch. These visually represent the two plates which hold the charge in a capacitor.
Shapes serve to represent different parts in an electronic circuit. They have to be clear and concise in order to get their message across. For example, all diodes, including LED's, are represented by triangles pointing to a perpendicular line. Unlike the capacitor or resistor, the diode symbol is not directly related to their construction or even their function, but serves as a consistent, eye-catching representation, onto which modifications can be attached to indicate special functions.


To understand any electrical circuit, the order that the elements are connected in is key. Unlike most applications of direction, it does not matter so much if an element is facing right, left, up, or down, but where it is in relation to others. Some elements, especially logic gates and IC diagrams, where connections occur on an otherwise unlabeled element are very important. For example, the direction logic gates are facing determine which side is the input and output, the input being at the larger end, and output at the smaller.

Thursday, October 20, 2011

Visual Thinking Research

Block Twins
This block puzzle was slightly ambiguous, and my roommate and I both had different ideas about how it was supposed to work. I thought it was asking which shapes were composed of two equal pairs, and so I circled the 6 which I thought could be split into two equal parts. I started with the ones with no extra blocks in between, but after about 3 circles, I realized the others with equal halves all had one extra block in the center. So then I circled those too. I checked to see if the halves were mirrored, and if so, I did not circle them.
Here's my roommates sheet. As you can see, he paired up the different shapes, but he did so by looking to see if the elements (halves) were similar, instead of the shape as a whole. He didn't try to mentally rotate the shape and compare them, as we learned the test required. In this way, both of us kind of failed miserably. The instructions were not clear, and the last part saying that "a shape from one pair doesn't appear in another" did not help at all.

Areas in the Big Square
This one was a lot more straightforward, and in the end, we both got the right answer. Above, you see my roomates work, where he separated the overlapping edges, and counted how many edges of the squares inside were visible. This method worked well for him, and he actually came up with the answer, that the blue and green circles have the same area, before me.
Here you can see mine, where I counted each section which was overlapped. I assigned sections overlapped by another color more "value" than ones overlapped by the same color, but counted both. Mine was not as visually apparent, because I had to think about it in numbers as opposed to shapes, but I came to the same conclusion. The irregular configuration also made it difficult to apply this strategy, as I found myself mixing up which number went with which color.

Thursday, October 13, 2011

Visual Perception 2/Feature Hierarchy


The GE Wattstation by fuseproject is an attempt to make electric cars more publicly accessible to new owners. Doubling as a parking meter, this charger is planned to be brightly colored to differentiate it from normal ones, drawing attention to it. The design is trimmed down the charger to its bare functions: the plug itself and the coiled cord which is instantly visible. Upon looking at the device, we are greeted by a friendly interface with "Hello". This is indicated to be a touch screen button by its bright outline. Instead of having many features which draw your attention away from the primary function, this charger makes the process as simple as possible by presenting the users with very few visual elements, besides the necessary intuitive ones. This is a departure from previous chargers, which could provide the user with too much information, or too many charging options. By restricting it to its basic functions, it focuses the user on the essentials, which are all lined up on top of one another to be located intuitively.

The Wattstation will be planted in a few test locations around San Francisco next year.

By Yves Behar and fuseproject Design.

Thursday, October 6, 2011

Top-Down Visual Processing

I thought this bus advertisement for the Copenhagen Zoo was particularly "gripping". The snake itself startling, but what really makes this paint job excellent is how the bus actually appears to be crushed. Though the edges around the snake are black, and the colors around the "crushed" areas are distorted, the effect is quite convincing. This comes from our Top-down visual processing of the image. We expect a black area in this case to be a shadow (from an absence of material), and shades of color indicate to us the material has depth, and is deformed. This effect is especially strong when we only see it in a two-dimensional image.

From Bates Y&R, Copenhagen